Let’s Hit Our First API!
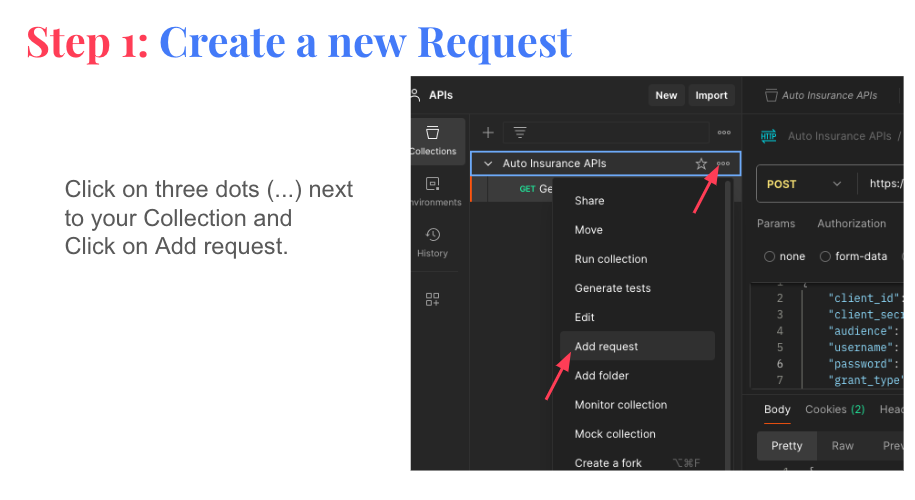
By now, you’ve likely read about what APIs are, why we need them, and their amazing benefits. If not, we recommend checking out those documents before moving forward 📖. Once you're ready, let’s dive into hitting our first API using the token we generated in Step 1 🔑!
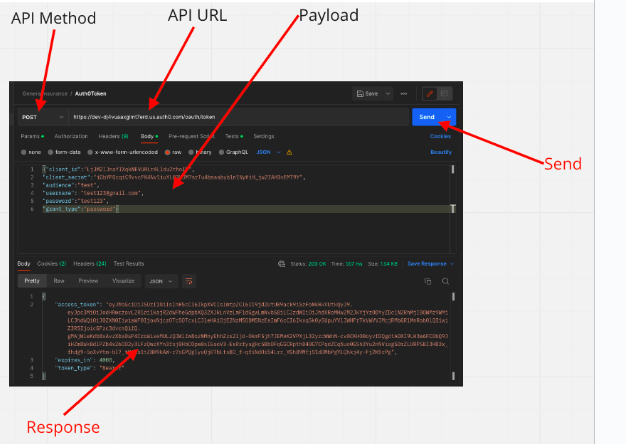
What Do You Need to Hit the API?
To make your first API request, you’ll need the following details:
- 🌐 URL:
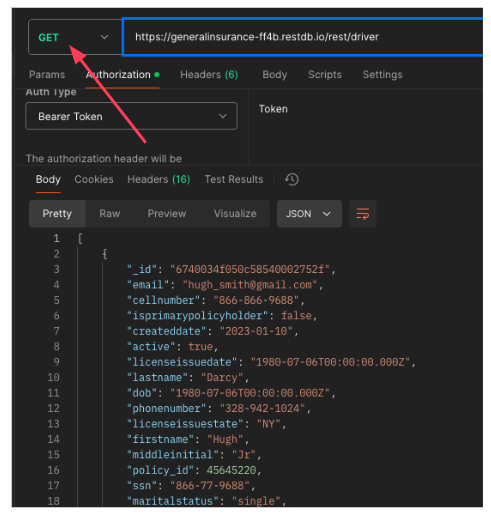
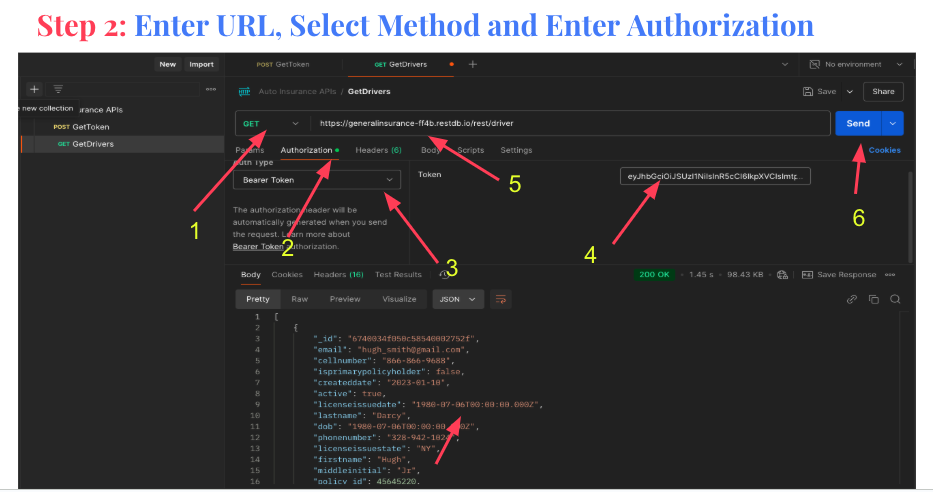
https://generalinsurance-ff4b.restdb.io/rest/driver
This is the endpoint where the API resides, specifically designed to fetch driver data.
- ⚙️ Method:
GET
This tells the API that we’re requesting data without making any changes.
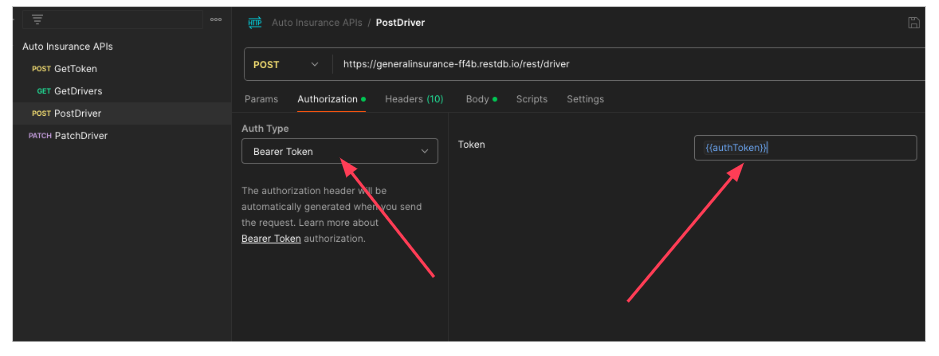
- 🔒 Authorization:
Bearer {token}
This ensures that only authorized users with a valid token can access the API.
What’s Happening Behind the Scenes?
When you send this API request, here’s what happens:
- 🛠️ The GET method fetches driver information from the server, like names, license numbers, and contact details.
- 📬 The Authorization header (Bearer token) validates your identity, ensuring secure access.
- 📊 The server processes your request and sends back the data in a structured format, like JSON.
Ready to Hit the API?
Let’s put these details into action! You can use tools like Postman 🛠️ or your browser’s network inspector to send the request. Once you receive the data, you’ve officially made your first API call! 🚀
Understanding the API URL and Response
The URL we used in this request is our API URL 🌐, where all the APIs for our system are hosted. Each part of this URL has a specific purpose:
- 🔗 Base URL:
https://generalinsurance-ff4b.restdb.io/rest/
This is the common starting point for all our APIs.
- 🚗 Driver Endpoint: The word
driver at the end of the URL specifies that this endpoint is used to access driver-related data.
To access these APIs, we use a token 🔑. This token authenticates you and ensures that the server can process your request securely.
Analyzing the Response
Once you hit the API, you’ll receive a response 📨. Take a moment to go through the data returned by the server. For the driver endpoint, you’ll see information such as:
- 👤 Name
- 📧 Email
- 🔒 SSN (Social Security Number)
But how do we know if this data is correct? 🤔 That’s where testing comes in! In the next sections, we’ll learn how to verify the accuracy of the data and ensure everything is working as expected.
Experiment with a New Endpoint
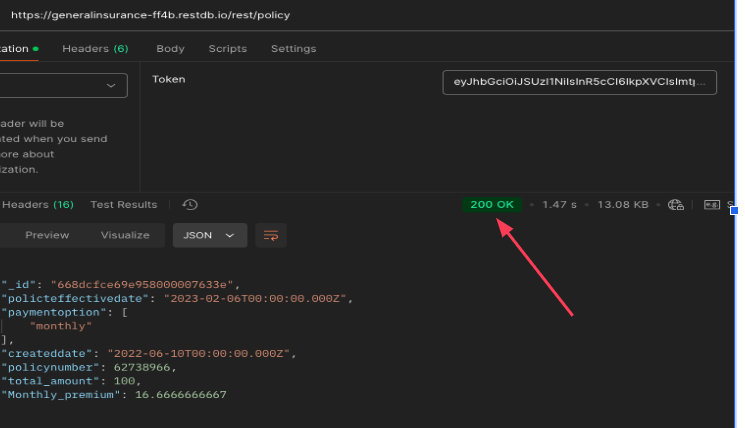
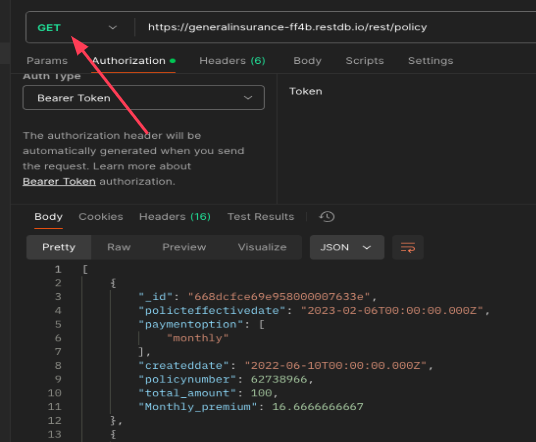
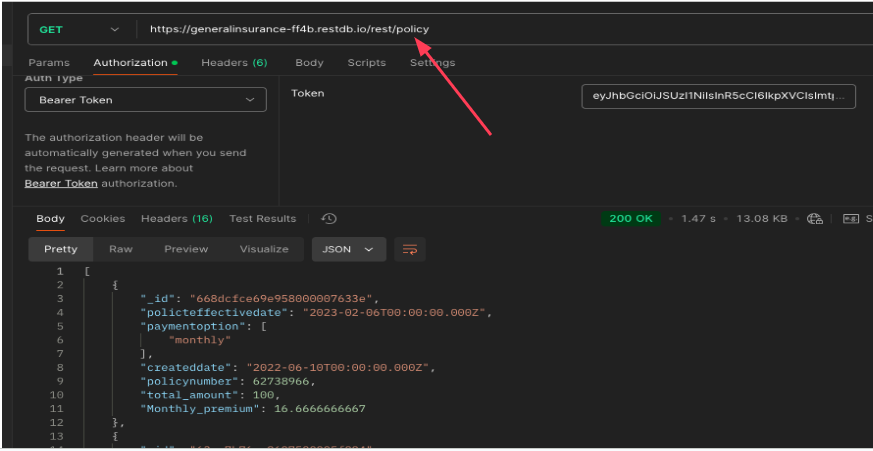
Now, let’s try something different! Change the word driver in the URL to policy and hit send again 🚀. This will fetch all data related to policies, such as:
- 📄 Policy Types
- 📆 Start and End Dates
- 💵 Premium Amounts
By switching endpoints, you’re exploring how APIs can retrieve different types of data with just a small change in the URL. Pretty powerful, right? 😊
Understanding GET APIs: Fetching Data
If you’ve noticed so far, all we’re doing is fetching data. We’re not creating new data or updating existing data, and there’s a good reason for that!
We’re using GET endpoints/APIs 🔎, which are specifically designed for fetching information. These APIs act like messengers, bringing back data from the server without making any changes to it. They’re perfect for retrieving details without worrying about altering anything accidentally.
Why Are GET APIs Important?
- 🔍 Safe Retrieval: GET APIs are non-destructive—they only fetch data without changing or deleting anything.
- 📋 Read-Only Operations: Perfect for viewing information like driver details, policies, or claims without modifying the underlying database.
- 🔒 Secure Access: Combined with tokens, GET APIs ensure that only authorized users can access sensitive data.
Learn About Key API Endpoints
To take this further, check out the attached document 📄. It includes:
- 🌐 Details on API Endpoints: Learn how endpoints are structured and how they work.
- 🚗 Auto Insurance Company APIs: Discover the APIs we’ll be using in this project, such as those for drivers, vehicles, policies, and claims.
- 🛠️ Use Cases: See real-world examples of how these APIs are used to manage insurance data efficiently.
What’s Next?
As we move forward, we’ll explore APIs beyond GET. You’ll learn how to create, update, and even delete data using other API methods like POST, PUT, and DELETE. For now, dive into the document and get familiar with the endpoints we’ll be working with. Let’s unlock the full power of APIs! 🚀
Exploring API Endpoints
Now it’s time to dive deeper into our API endpoints! 🌐 Change the URL to any of the desired endpoints, such as:
- 👤 Driver:
/driver
- 📄 Policy:
/policy
- 🚗 Vehicle:
/vehicle
- 💳 Payment Details:
/paymentdetails
After making your selection, hit Send and watch the magic happen! 🚀
Be Curious About the Response
Take a closer look at the fields in each API response 🧐. These fields represent the data being fetched, and each one has a purpose. Here’s how to make the most of this exploration:
- ❓ Ask Questions: Think about each field. Why is this field important? What role does it play in the overall data structure?
- 🛠️ Plan Your Tests: How would you test each field? For example, is the driver’s name spelled correctly? Is the policy start date valid?
- ✅ Validate the Data: Check if the data in each field makes sense. For instance, are payment amounts accurate, or are vehicle registration numbers formatted correctly?
Why This Matters
This exercise isn’t just about fetching data—it’s about understanding it. By questioning each field, you’ll start to think like a tester and uncover hidden insights. The more curious you are, the better prepared you’ll be to ensure the quality of APIs in real-world scenarios.
What’s Next?
Once you’ve explored the fields and responses, jot down your observations and ideas for testing. In the upcoming sections, we’ll dive into structured approaches to test these APIs effectively and ensure they meet expectations. Let’s keep the momentum going! 💡
